WINAMP COLOR THEMES
Winamp support classic and modern skins. Winamp Modern skins allows to change Winamp look and behavior. Changing Winamp look is possible thanks to Color Themes. Color Themes are a set of special text files that determine the look of Winamp skins. This text files are written as XML document. Default Winamp skins contains plenty of predefined color themes.
Thanks to the Winamp community, there are tons of color themes that you can use in Winamp or WACUP. The most popular and the best of them have been compiled into one Color Themes Installer which can be downloaded from the download section. It also includes a special tool, the so-called Color Editor. Thanks to this tool, creating new Color Themes or editing existing ones is very simple.
Winamp Color Themes Installer is written in NSIS. The installation process is described in this document. It shouldn't be a problem for anyone. Installer will copy required files and will configure system.
TECHNICAL SPECIFICATIONS
XML document contains XML declaration, that is located at the begining of the file. It contains version attribute and two optional attributes: encoding and standalone.
<?xml version="1.0" encoding="UTF-8" standalone="yes"?>
- The version attribute declares version of XML document (1.0 or 1.1).
- The encoding attribute declares the character set used in the XML document. The default character set is UTF-8 (Unicode).
- The standalone attribute declares XML document mode. It can be set to yes or no. The 'yes' value means that the document does not contain any other files that must be processed with the document (this could be for example an external stylesheet or DTD definition).
Another XML file element is WasabiXML declaration. WasabiXML is an XML object that contains all objects of the skin (it is a container for GUI objects). It has version attribute.
<WasabiXML version="1.34">
- The version attribute declares Freeform Plugin Core version. Actually it is v1.34
The last element of XML document is Color Themes declaration. There is a gammaset object definition (representing the Color Theme) and gammagroup object definition (group of elements with specific properties).
<gammaset id="*Default">
The 'gammaset' object is parent element and it defines Color Themes. It contains 'id' attribute.
- The id attribute represents the name of the Color Theme. The default Color Theme name is '*Default'.
<gammagroup id="Titlebar" value="0,0,0" gray="0" boost="0" />
The 'gammagroup' object is an element that defines specific GUI element (for example: Titlebar). It contains 'id', 'value', 'gray' and 'boost' attributes.
- The id attribute declares the name of GUI element that we want to describe
- The value attribute declares the color of specific GUI element (in RGB or HSL scale, scope is -4096 to 4096)
- The gray attribute defines grayscale value (1 or 2). When set to "1" the gammagroup elements will be treated as having a light gray base. When set to "2" the gammagroup elements will be treated as having a dark gray base.
- The boost attribute defines saturation (0 or 1). When set to "1", boost brightens up the gammagroup by adding 50% more white to it.
You can find below the example Bento / Big Bento Color Themes file with default Color Theme named '*Default'.
<WasabiXML version="1.34">
<gammagroup id="TitlebarText" value="0,0,0" gray="0" boost="0" />
<gammagroup id="TitlebarMenuText" value="0,0,0" gray="0" boost="0" />
<gammagroup id="TitleButtonOrange" value="0,0,0" gray="0" boost="0" />
<gammagroup id="TitleButtonGrey" value="0,0,0" gray="0" boost="0" />
<gammagroup id="WindowBackground" value="0,0,0" gray="0" boost="0" />
<gammagroup id="WindowText" value="0,0,0" gray="0" boost="0" />
<gammagroup id="Column Text" value="0,0,0" gray="0" boost="0" />
<gammagroup id="DisplayText" value="0,0,0" gray="0" boost="0" />
<gammagroup id="ScrollbarTrack" value="0,0,0" gray="0" boost="0" />
<gammagroup id="PlayerDisplay" value="0,0,0" gray="0" boost="0" />
<gammagroup id="PlayerDisplayGradient" value="0,0,0" gray="0" boost="0" />
<gammagroup id="ComponentFrame" value="0,0,0" gray="0" boost="0" />
<gammagroup id="PlayerButton" value="0,0,0" gray="0" boost="0" />
<gammagroup id="PlayerShadeSlider" value="0,0,0" gray="0" boost="0" />
<gammagroup id="PlayerButtonPlaceHolder" value="0,0,0" gray="0" boost="0" />
<gammagroup id="PlayerButtonGlow" value="0,0,0" gray="0" boost="0" />
<gammagroup id="PlayerButtonActive" value="0,0,0" gray="0" boost="0" />
<gammagroup id="PlayerSliderLight" value="0,0,0" gray="0" boost="0" />
<gammagroup id="PlayerSliderBackground" value="0,0,0" gray="0" boost="0" />
<gammagroup id="WindowBackgroundGradient" value="0,0,0" gray="0" boost="0" />
<gammagroup id="CompButtonInactive" value="0,0,0" gray="0" boost="0" />
<gammagroup id="CompButtonActive" value="0,0,0" gray="0" boost="0" />
<gammagroup id="CompButtonInactiveText" value="0,0,0" gray="0" boost="0" />
<gammagroup id="CompButtonActiveText" value="0,0,0" gray="0" boost="0" />
<gammagroup id="SelectionBg" value="0,0,0" gray="0" boost="0" />
<gammagroup id="SelectionBg Inactive" value="0,0,0" gray="0" boost="0" />
<gammagroup id="Selection" value="0,0,0" gray="0" boost="0" />
<gammagroup id="LightningBolt" value="0,0,0" gray="0" boost="0" />
<gammagroup id="Column" value="0,0,0" gray="0" boost="0" />
<gammagroup id="ShadeButton" value="0,0,0" gray="0" boost="0" />
<gammagroup id="NotifierBackground" value="0,0,0" gray="0" boost="0" />
<gammagroup id="NotifierText" value="0,0,0" gray="0" boost="0" />
<gammagroup id="NotifierTextShadow" value="0,0,0" gray="0" boost="0" />
<gammagroup id="NotifierUpperTextShadow" value="0,0,0" gray="0" boost="0" />
<gammagroup id="NotifierUpperText" value="0,0,0" gray="0" boost="0" />
<gammagroup id="Frame_Borders" value="829,-192,-804" gray="0" boost="0" />
You can find below the example Winamp Modern Color Themes file with default Color Theme named 'Default'.
<WasabiXML version="1.34">
<gammagroup id="Backgrounds2" value="0,0,0" gray="0" boost="0" />
<gammagroup id="Bolt" value="0,0,0" gray="0" boost="0" />
<gammagroup id="Menubar" value="0,0,0" gray="0" boost="0" />
<gammagroup id="MenubarText" value="0,0,0" gray="0" boost="0" />
<gammagroup id="Titlebar" value="0,0,0" gray="0" boost="0" />
<gammagroup id="TitlebarText" value="0,0,0" gray="0" boost="0" />
<gammagroup id="TitlebarElements" value="0,0,0" gray="0" boost="0" />
<gammagroup id="TitlebarHover" value="0,0,0" gray="0" boost="0" />
<gammagroup id="Text" value="0,0,0" gray="0" boost="0" />
<gammagroup id="Text Inverse" value="0,0,0" gray="0" boost="0" />
<gammagroup id="Buttons" value="0,0,0" gray="0" boost="0" />
<gammagroup id="ButtonsHover" value="0,0,0" gray="0" boost="0" />
<gammagroup id="Buttons2" value="0,0,0" gray="0" boost="0" />
<gammagroup id="ButtonsHover2" value="0,0,0" gray="0" boost="0" />
<gammagroup id="ButtonGlow" value="0,0,0" gray="0" boost="0" />
<gammagroup id="ButtonsActive" value="0,0,0" gray="0" boost="0" />
<gammagroup id="ButtonStatus" value="0,0,0" gray="0" boost="0" />
<gammagroup id="ButtonText" value="0,0,0" gray="0" boost="0" />
<gammagroup id="Scrollbar Buttons" value="0,0,0" gray="0" boost="0" />
<gammagroup id="Scrollbar Hover" value="0,0,0" gray="0" boost="0" />
<gammagroup id="Led" value="0,0,0" gray="0" boost="0" />
<gammagroup id="Display" value="0,0,0" gray="0" boost="0" />
<gammagroup id="DisplaySongtickerBG" value="0,0,0" gray="0" boost="0" />
<gammagroup id="DisplayElements" value="0,0,0" gray="0" boost="0" />
<gammagroup id="DisplayVis" value="0,0,0" gray="0" boost="0" />
<gammagroup id="DisplayBeatVis" value="0,0,0" gray="0" boost="0" />
<gammagroup id="DisplaySongticker" value="0,0,0" gray="0" boost="0" />
<gammagroup id="DisplaySongtickerShade" value="0,0,0" gray="0" boost="0" />
<gammagroup id="ProgressBar" value="0,0,0" gray="0" boost="0" />
<gammagroup id="BGOverlayDark" value="0,0,0" gray="0" boost="0" />
<gammagroup id="BGOverlayBright" value="0,0,0" gray="0" boost="0" />
<gammagroup id="BG2Textoverlay" value="0,0,0" gray="0" boost="0" />
<gammagroup id="TextDark" value="0,0,0" gray="0" boost="0" />
<gammagroup id="ListText" value="0,0,0" gray="0" boost="0" />
<gammagroup id="ListTextSelected" value="0,0,0" gray="0" boost="0" />
<gammagroup id="ListTextCurrent" value="0,0,0" gray="0" boost="0" />
<gammagroup id="ListBackground" value="0,0,0" gray="0" boost="0" />
<gammagroup id="ListSelBackground" value="0,0,0" gray="0" boost="0" />
<gammagroup id="ListColumnText" value="0,0,0" gray="0" boost="0" />
<gammagroup id="Tooltips Background" value="0,0,0" gray="0" boost="0" />
<gammagroup id="Tooltips Text" value="0,0,0" gray="0" boost="0" />
<gammagroup id="TextDarkShadow" value="0,0,0" gray="0" boost="0" />
<gammagroup id="ListSelection" value="0,0,0" gray="0" boost="0" />
<gammagroup id="BG0Textoverlay" value="0,0,0" gray="0" boost="0" />
<gammagroup id="DisplaySongicker" value="0,0,0" gray="0" boost="0" />
<gammagroup id="DisplaySongickerShade" value="0,0,0" gray="0" boost="0" />
<gammagroup id="Frontcover" value="0,0,0" gray="0" boost="0" />
<gammagroup id="DisplayLabel" value="0,0,0" gray="0" boost="0" />
<gammagroup id="VISDisplay" value="0,0,0" gray="0" boost="0" />
<gammagroup id="KnobLED" value="0,0,0" gray="0" boost="0" />
<gammagroup id="ButtonsFront" value="0,0,0" gray="0" boost="0" />
<gammagroup id="BackgroundLabel" value="0,0,0" gray="0" boost="0" />
<gammagroup id="FrontcoverLabel" value="0,0,0" gray="0" boost="0" />
<gammagroup id="PosLabel" value="0,0,0" gray="0" boost="0" />
<gammagroup id="CoverLabel" value="0,0,0" gray="0" boost="0" />
<gammagroup id="MainLabel" value="0,0,0" gray="0" boost="0" />
<gammagroup id="Thinger icons" value="0,0,0" gray="0" boost="0" />
<gammagroup id="ThingerButtons" value="0,0,0" gray="0" boost="0" />
<gammagroup id="Thinger" value="0,0,0" gray="0" boost="0" />
WINAMP COLOR EDITOR
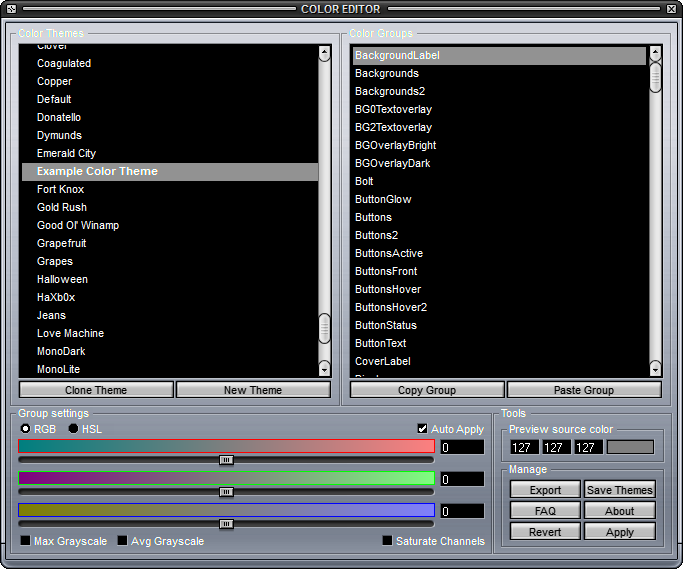
Winamp Color Editor is a special tool that allows users to create their own Color Themes. Thanks to this it is very simple and easy to do. You can find below Color Editor interface. Program is developed by Nullsoft.

Color Editor window is divided into several areas. Left upper panel shows a list of installed Color Themes. Right upper panel shows a list of Color Groups. There are two panels at the bottom of the window. The first one is Group settings panel for selected group of colors of Winamp interface. The second one is Tools panel. Each of these areas includes appropriate controls, which will be described below.
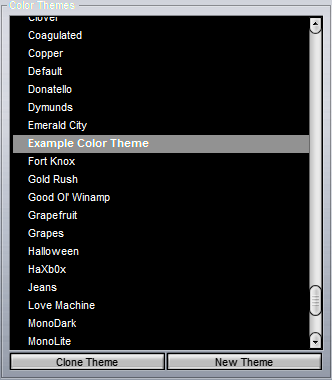
'Color Themes' panel
Color Themes panel is used to select a base Color Theme. It contains three controls.

- List of elements:
This list contains all of the installed Winamp Color Themes for the skin.
- Clone Theme button:
This button allows you to clone the selected Color Theme. This Color Theme can be edited.
- New Theme button:
This button allows you to create a new Color Theme with the default color values.
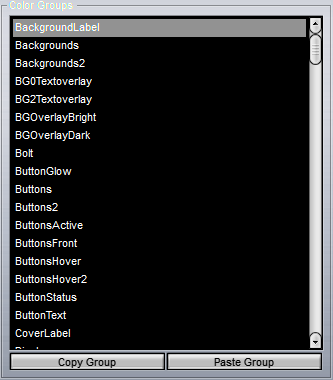
'Color Groups' panel
Color Groups panel is used to select groups of interface elements with the same properties. It contains three controls.

- List of elements:
This list contains color groups whose properties you want to edit.
- Copy Group button:
This button allows you to copy selected group of colors.
- Paste Group button:
This button allows you to paste the previously copied color group.
'Group Settings' panel
Group Settings panel allows to set selected group of colors suitable properties. It includes several controls described below.

- RGB radiobutton:
The RGB color model is an additive color model in which red, green, and blue light is added together in various ways to reproduce a broad array of colors. The name of the model comes from the initials of the three additive primary colors (r,g,b):
- R: Red color
- G: Green color
- B: Blue color
- HSL radiobutton:
HSL is cylindrical-coordinate representations of points in an RGB color model, which rearrange the geometry of RGB in an attempt to be more intuitive and perceptually relevant than the cartesian (cube) representation. HSL stands for hue, saturation, and lightness (h,s,l):
- H: Hue – values in 0..360° scope.
- S: Saturation – values in 0...1 or 0...100% scope.
- L: Lightness – values in 0...1 or 0...100% scope.
- Auto Apply checkbox:
This button allows you to preview all changes in real time.
- Color sliders:
This three sliders allows to determine the value of color components.
- Color fields:
This three fields allows to type value of color component.
- Max Grayscale checkbox:
This button allows you to determine the maximum range of gray scale.
- Avg Grayscale checkbox:
This button allows you to determine the average range of gray scale.
- Saturate Channels checkbox:
This button allows to saturate colors.
'Tools' panel
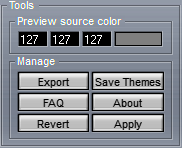
Tools panel contains a collection of functions necessary to create new Color Themes. It includes several controls grouped in two panels: 'Preview source color' and 'Manage'.

'Preview source color' panel:
- Color fields:
This fields allows you to type a value from given range (0..255) for selected component of color.
- Color palettle field:
Clicking this field allows you to select the source color from the color palette.
'Manage' panel:
- Export button:
This button allows you to export the edited Color Theme to an XML file. This file can be distributed as Winamp Color Theme (to be able to use it it must be placed in the Winamp Color Themes directory, see FAQ 2).
- Save Themes button:
This button allows you to save any changes made when editing colors (see FAQ 14).
- FAQ button:
This button allows you to display the webpage with Winamp Color Themes FAQ.
- About button:
This button allows you to display the dialog box that presents information about the Color Editor-name, version, copyright and credits.
- Revert button:
This button allows you to undo any changes made when editing colors.
- Apply button:
This button allows you to apply the changes and preview them.
FAQ
- Why can't I edit my skin's Color Themes ? Why is there a “locked” icon in front of them?
A skin may be zipped, and so the Color Editor cannot 1) unzip your skin, 2) change the themes definitions, and 3) rezip the skin. Even if it could, or if the skin was unzipped in the first place, the Color Editor would have to find the file that defines the Color Themes, and this may be any xml file in the skin. The Color Editor's philosophy is therefore not to touch the skins directly : the only editable Color Themes are those you create. To edit a Color Theme, you should clone it first !
- How can I send my colorthemes to someone without making him edit his skin ?
You should first export your colorthemes using the export button on the Color Editor, and then install the exported file into the Winamp5 colorthemes directory located at :
path_to_winamp\plugins\ColorThemes\name_of_the_skin\
The file you install should have the xml extention and a somewhat unique name so that it does not conflicts with other custom themes packs (ie: not “themes.xml”). Upon reloading Winamp5, the themes should now appear in the colorthemes selection box. Note that they will not be editable (see faq 1 above).
- Why does going from RGB to HSL sometimes slightly changes my color group setting ?
Although all RGB colors have an HSL equivalent and vice-versa, these are not one-to-one equivalents (two RGB colors may have the same HSL equivalent). This is a consequence of the RGB/HSL conversion algorithms.
- How do I create a new color group ?
Color groups are an integral part of the skin, they change for each skin, and they are defined by the skinner. The Color Editor's purpose is to let you assign new color values for these color groups, not to let you create more groups in the skin you are using or for the skin you are making.
- How do I find what color group is used by a given widget ?
The only way to do this for now is to try each color group. A later version may let you flash a specific color group in the skin, but this will be very cpu-intensive (changing a color group reloads all the skins images), but since a given widget may implicitly use more than one colortheme, we would need to have the skinner list these colorthemes explicitly for each widget to be able to let you find this out more easily. This would be a daunting task for the skinner, and so this is not a viable option.
- Why are there widgets for which there is no color group ?
Either the skinner forgot to define a color group for the graphical elements used by the widget, or you have missed it.
- What is the difference between “Max Grayscale” and “Avg Grayscale” ?
Max grayscale is computed by getting the maximum value of each red, green and blue color channels, and assigning this value to each three (each pixel is done independently). Avg (average) grayscale is computed by getting the average value of the red, green and blue color channels, and assigning this value to each three (each pixel is done independently).
- What is “Saturate channels” ?
“Saturate channels” adds 127 to each pixels's color channel.
- Why is the resulting color for the graphical element not the color that I see above each slider ?
The color you see above each slider is the color you get for a pixel that has the “Preview source color” values for its color channels. To get an accurate result, you should select a previous source color that is approximately the average color of the graphical element you are tweaking. For instance, if you are changing a graphical element that has only red (ie: it has 0 in its green and blue channels), no matter the poxition of the green and blue sliders, it will not change anything in the element. If that happens, you can use one of the two grayscale checkboxes, so that the element will be grayscaled before the color tweak is applied, or you can use the saturate channels checkbox to boost its color channels so that all three sliders will have an effect.
- Why does the red (or green or blue) slider has no effect on some widget ?
See faq 9.
- Why does the red green and blue values for each color group goes from -4096 to +4096 rather than from 0 to 255 ?
The red green and blue values in the xml for a Color Theme are not a direct representation of the color you get (otherwise, it would make all pixels this value!), they are (arbitrarilly ranged) values that are used to multiply (or divide) each pixels's channel.
- Why does the hue slider cycles twice over the hue circle ?
The hue slider works just as the RGB sliders do, it changes each pixel color starting from its original channel values. The hue value you select makes the pixel's hue be shifted left or right over the hue circle just as the red (or green or blue) sliders shifts the red (or green or blue) value left or right in the original pixel, and so you can go one complete circle in one direction, or one complete circle in the other. In effect, where photoshop lets you go from 0° to 360° on the hue circle, the Color Editor lets you go from -360° to +360°.
- Why do the saturation and luminance sliders show a gradient between 2 colors rather than the standard color-to-white and color-to-black gradients ?
Here too, the sliders let you change the original pixels one direction or another, so the saturation slider lets you desaturate a pixel beyond the zero limit (and the luminance slider lets you subtract luminosity bellow the zero limit) of a standard HSL algorithm. In effect, where photoshop lets you go from 0 to 100% for these two components, the Color Editor lets you go from -100% to +100%.
- Where are the themes saved?
When you save your themes it will save in one of the following places, depending on what type of installation of Winamp you have:
- Multi-User Settings Install (default) - %appdata%/winamp/Plugins/Freeform/wacs/coloreditor/data
- Winamp folder Settings - x:/.../winamp/Plugins/Freeform/wacs/coloreditor/data
- Multi Slider move
When you move one of the sliders you can press Ctrl or Shift to move the other 2 sliders too. This is sometimes usefull of you just want to finetune a certain color.
- Ctrl+Slide - All sliders have the same value.
- Shift+Slide - The other 2 sliders will now move relative to the one your moving.